How to Repair a Tire? (2026 Guide)
A flat tire can disrupt your day, but knowing how to repair a tire properly can save you time and money. Most minor tread punctures are repairable using a combination patch-plug method, which is the industry standard for a permanent and safe fix. This repair involves both sealing the puncture...
")
A flat tire can disrupt your day, but knowing how to repair a tire properly can save you time and money. Most minor tread punctures are repairable using a combination patch-plug method, which is the industry standard for a permanent and safe fix. This repair involves both sealing the puncture channel and reinforcing the tire’s inner liner. You will find detailed tables and FAQs below.
- 1. When Can You Repair a Tire? (2026 Guidelines)
- 1.1. Puncture Location is Key
- 1.2. Puncture Size Limits
- 1.3. Tire Condition Matters
- 2. When Should You NOT Repair a Tire?
- 3. Essential Tools and Materials for Tire Repair (2026 Edition)
- 3.1. Standard Tire Repair Kit Contents:
- 3.2. Additional Recommended Items:
- 4. Step-by-Step Guide: How to Repair a Tire with a Plug Kit
- 4.1. 1. Ensure Safety First
- 4.2. 2. Gather Your Tools
- 4.3. 3. Locate the Puncture
- 4.4. 4. Remove the Object
- 4.5. 5. Prepare the Hole (Reaming)
- 4.6. 6. Prepare the Plug
- 4.7. 7. Insert the Plug
- 4.8. 8. Trim the Excess
- 4.9. 9. Inflate the Tire
- 4.10. 10. Check for Leaks
- 4.11. 11. Reinstall the Wheel (If Removed)
- 5. Professional Tire Repair: Patching vs. Plugging
- 5.1. Tire Plugs (Temporary Fix)
- 5.2. Tire Patches (Internal Repair)
- 5.3. Combination Patch-Plug (The Industry Standard)
- 6. Post-Repair Care and Safety
- 7. Frequently Asked Questions
- 7.1. How long does a tire repair last?
- 7.2. Can all flat tires be repaired?
- 7.3. Is a tire plug safe?
- 7.4. What is the cost of tire repair in 2026?
- 7.5. Can I drive on a plugged tire indefinitely?
- 8. Table: Tire Repair Eligibility Quick Reference (2026)
When Can You Repair a Tire? (2026 Guidelines)
Not every tire puncture is repairable. Safety standards strictly define when a tire can be fixed. Understanding these limits is crucial. Repairability depends on the damage location, size, and the tire’s overall condition.
Puncture Location is Key
- Tread Area Only: You can only repair punctures located within the tire’s tread area. This is the central part that makes contact with the road.
- No Sidewall or Shoulder Damage: Damage to the sidewall or shoulder (the transition zone between the tread and sidewall) is not repairable. These areas flex significantly, and a repair would likely fail, risking a blowout.
Puncture Size Limits
- Small Punctures Only: A puncture must be no larger than 1/4 inch (6mm) in diameter. Anything larger compromises the tire’s structural integrity too much for a safe repair.
Tire Condition Matters
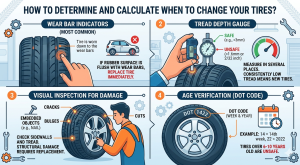
- Adequate Tread Depth: The tire must have at least 2/32 inch (1.6mm) of tread remaining. This is the legal minimum tread depth.
- No Internal Damage: A tire driven flat, even for a short distance, may suffer internal structural damage not visible from the outside. Such tires are often unrepairable.
- No Exposed Cords: If the damage exposes the tire’s internal cords or belts, it is not repairable.
- Age: Tires older than 6-10 years, regardless of tread, may have internal degradation. Many shops will refuse to repair very old tires.
- Previous Repairs: Repairs should not overlap existing repairs. Multiple punctures too close together (e.g., within 16 inches) often mean the tire needs replacement.
When Should You NOT Repair a Tire?
Attempting to repair a tire outside of established safety guidelines is extremely dangerous. It can lead to tire failure, loss of vehicle control, and serious accidents. Always prioritize safety over saving money.

- Sidewall or Shoulder Punctures: Any damage in these zones makes the tire unrepairable. The constant flexing in these areas makes a patch or plug unreliable.
- Large Punctures: Holes exceeding 1/4 inch (6mm) in diameter cannot be safely repaired.
- Run-Flat Damage: If you drove on a completely flat run-flat tire, the internal structure may be compromised. Most manufacturers prohibit repairs in this scenario.
- Exposed Cords or Belts: Visible internal structural components mean the tire’s integrity is lost.
- Low Tread Depth: If the tire’s tread is worn below 2/32 inch, it is unsafe for repair.
- Multiple or Overlapping Punctures: Two or more punctures too close together (e.g., within 16 inches) or overlapping previous repairs deem the tire irreparable.
- Cracked or Deteriorated Rubber: Signs of aging, dry rot, or cracking indicate a compromised tire that should be replaced.
- Previous Improper Repairs: If a tire has an existing, improperly performed repair (like a plug without an internal patch), it should generally not be re-repaired.
Essential Tools and Materials for Tire Repair (2026 Edition)
Having the right tools is essential for a successful and safe tire repair. While professional shops use specialized equipment, a quality DIY kit can handle minor punctures.
Standard Tire Repair Kit Contents:
- T-Handle Rasp/Reamer Tool: This tool cleans and enlarges the puncture hole. It prepares the hole for the plug.
- T-Handle Plug Insertion Tool: This tool pushes the tire plug into the prepared hole.
- Self-Vulcanizing Tire Plugs: These sticky, rubber-coated cords create a chemical bond with the tire’s rubber, forming a permanent seal.
- Rubber Cement/Lubricant: This aids in inserting the plug and enhances the seal’s permanence.
- Pliers: You need pliers to remove the object that caused the puncture.
- Utility Knife/Razor Blade: This trims excess plug material flush with the tire surface.
- Tire Pressure Gauge: Essential for checking and maintaining correct tire pressure.
- Portable Air Compressor/Tire Inflator: To reinflate the tire after repair.
Additional Recommended Items:
- Jack and Lug Wrench: For safely removing the wheel from your vehicle.
- Jack Stands: To secure the vehicle when lifted.
- Soapy Water Solution: Helps locate leaks by creating bubbles.
- Safety Glasses and Gloves: Protect your eyes and hands during the repair.
- Durable Carrying Case: Keeps all your tools organized and protected.
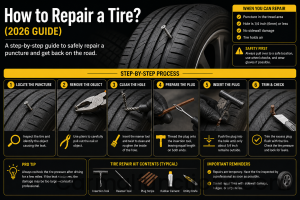
Step-by-Step Guide: How to Repair a Tire with a Plug Kit
Performing a DIY tire repair requires careful attention to detail and safety. This guide focuses on using a plug kit for minor tread punctures.
1. Ensure Safety First
- Pull Over Safely: Find a level, safe area away from traffic. Turn on your hazard lights.
- Engage Parking Brake: Apply the parking brake.
- Block Wheels: If possible, place chocks or heavy objects around the tires that are not flat.
2. Gather Your Tools
- Collect your tire repair kit, jack, lug wrench, and air compressor.
3. Locate the Puncture
- Inspect the tire tread thoroughly for the object causing the leak.
- If you cannot see it, slowly inflate the tire and listen for a hissing sound.
- Alternatively, spray soapy water over the tire surface. Bubbles will pinpoint the leak.
- Ensure the puncture meets repair criteria (tread area, under 1/4 inch). If not, do not proceed.
4. Remove the Object
- Use pliers to carefully pull the nail, screw, or debris straight out of the tire.
- Be ready for air to escape rapidly.
5. Prepare the Hole (Reaming)
- Take the T-handle rasp or reamer tool.
- Insert it into the puncture hole. Push it in and out repeatedly. This cleans the hole and roughens the edges.
- This action creates a proper channel for the plug.
6. Prepare the Plug
- Thread a self-vulcanizing plug through the eye of the insertion tool. Center it.
- Apply rubber cement or lubricant to the plug. This aids insertion and promotes a strong seal.
7. Insert the Plug
- Push the insertion tool, with the plug, firmly into the prepared hole.
- Push until only a small portion (about 1/2 inch to 2 cm) of the plug remains outside the tire.
- Pull the insertion tool out quickly and straight. Do not twist. The plug should remain in place.
8. Trim the Excess
- Use a utility knife or razor blade to trim the excess plug material. Cut it flush with the tire tread.
- This creates a smooth surface and prevents future issues.
9. Inflate the Tire
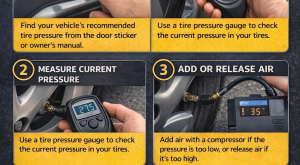
- Use your portable air compressor to inflate the tire to the manufacturer’s recommended pressure. This information is usually found on a sticker inside your driver’s side door jamb.
10. Check for Leaks
- Spray soapy water over the repaired area. Look for any bubbles forming.
- No bubbles mean a successful seal. If you see bubbles, the repair may be leaking. You might need to re-insert the plug or apply another.
11. Reinstall the Wheel (If Removed)
- Mount the tire back onto your vehicle. Tighten lug nuts by hand initially.
- Lower the vehicle. Then, tighten the lug nuts in a star pattern to the manufacturer’s specified torque using a torque wrench.
Professional Tire Repair: Patching vs. Plugging
While DIY plug kits offer a temporary roadside solution, professional repairs are often recommended for long-term safety. The gold standard in professional tire repair is the “combination patch-plug” method.
Tire Plugs (Temporary Fix)
- External Application: Plugs are inserted from the outside of the tire.
- Quick Fix: They are fast and do not require removing the tire from the rim.
- Limitations: Plugs alone are generally considered temporary repairs. They fill the puncture channel but do not permanently seal the tire’s inner liner. This can allow moisture to enter the tire structure, potentially leading to corrosion of steel belts.
- Industry Stance: The U.S. Tire Manufacturers Association (USTMA) and Tire Industry Association (TIA) do not approve plugs by themselves as a safe, permanent repair.
Tire Patches (Internal Repair)
- Internal Application: Patches are applied to the inside of the tire, after it is dismounted from the rim.
- Stronger Seal: A patch adheres to the inner liner, creating a durable, airtight seal that reinforces the tire from the inside.
- Requires Dismounting: This method requires specialized equipment to dismount, inspect, and remount the tire.
Combination Patch-Plug (The Industry Standard)
- Best of Both: This method involves both inserting a plug from the outside and applying a patch to the inside.
- Comprehensive Seal: The plug fills the puncture channel, and the patch seals the inner liner. This prevents air leakage and protects internal components from moisture.
- Permanent and Safe: This is the only repair method fully approved by the USTMA and TIA for a permanent, safe repair of tread punctures.
- Professional Recommendation: Most reputable shops perform this type of repair.
Post-Repair Care and Safety
After repairing a tire, proper care and monitoring are essential for your safety and the longevity of the repair.
- Check Tire Pressure Regularly: Always maintain the correct tire pressure. This is critical for tire performance and safety.
- Monitor the Repair: Visually inspect the repaired area periodically. Look for any signs of leakage, bulges, or deterioration.
- Drive Cautiously: For the first few miles after a DIY plug, drive at moderate speeds. This allows the plug to settle and vulcanize.
- Professional Inspection: Even after a DIY plug, it is highly recommended to have the tire professionally inspected as soon as possible. A professional can dismount the tire and perform a proper internal inspection and a patch-plug repair.
- Speed Limits: Some manufacturers advise against driving at high speeds on a repaired tire, especially if it’s only a plug. Always check your tire manufacturer’s guidelines.
- Consider Tire Replacement: If the tire is old, heavily worn, or has multiple repairs, consider replacing it sooner rather than later for optimal safety.
Frequently Asked Questions
How long does a tire repair last?
A properly performed combination patch-plug repair can last for the remaining life of the tire. DIY plugs are generally considered temporary fixes.
Can all flat tires be repaired?
No, not all flat tires are repairable. Punctures must be in the tread area, smaller than 1/4 inch (6mm), and the tire must not have internal damage or be excessively worn. Sidewall damage is never repairable.
Is a tire plug safe?
A standalone tire plug is considered a temporary, emergency fix. It should only get you safely to a repair shop. For a safe, permanent solution, a combination plug-patch repair is required.
What is the cost of tire repair in 2026?
A professional tire repair (patch-plug combo) typically costs between $20 and $50. Prices vary by location, shop type, and tire type. Some shops may offer free repairs if you purchased tires from them. DIY kits are much cheaper, around $10-$20.
Can I drive on a plugged tire indefinitely?
No, you should not drive on a simple plugged tire indefinitely. Plugs are temporary. You should have the tire professionally inspected and properly repaired with a patch-plug combination as soon as possible.
Table: Tire Repair Eligibility Quick Reference (2026)
| Damage Type | Location | Size | Repairable? | Recommendation |
|---|---|---|---|---|
| Small Puncture (Nail/Screw) | Tread Area | < 1/4 inch (6mm) | Yes | Professional patch-plug combo. DIY plug for temporary use. |
| Large Puncture | Tread Area | ≥ 1/4 inch (6mm) | No | Replace tire. |
| Any Puncture/Cut | Sidewall or Shoulder | Any size | No | Replace tire. |
| Multiple Punctures | Tread Area | Close together (<16 inches) | No | Replace tire. |
| Internal Damage | Not visible externally | After driving flat | No | Replace tire. |
| Exposed Cords/Belts | Anywhere | Any size | No | Replace tire. |
| Low Tread Depth | Anywhere | < 2/32 inch | No | Replace tire. |
Knowing how to repair a tire safely is a valuable skill for any driver. Regularly inspect your tires, maintain correct pressure, and understand the limitations of repairs. Prioritizing tire health and seeking professional advice when needed ensures your safety on the road and extends the life of your tires. Do not compromise on safety; a properly repaired tire is crucial for your vehicle’s performance and your peace of mind.