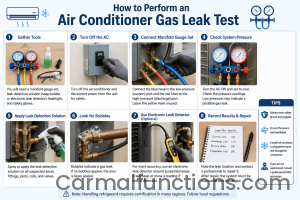
How to Perform an Air Conditioner Gas Leak Test?
Performing an air conditioner gas leak test is crucial for maintaining your system’s efficiency and preventing costly repairs. Refrigerant, often referred to as “Freon,” is the lifeblood of your AC system, enabling it to cool your home. A leak in this sealed system means your AC cannot effectively transfer heat,...

Performing an air conditioner gas leak test is crucial for maintaining your system’s efficiency and preventing costly repairs. Refrigerant, often referred to as “Freon,” is the lifeblood of your AC system, enabling it to cool your home. A leak in this sealed system means your AC cannot effectively transfer heat, leading to reduced performance and potential damage. You will find detailed tables and FAQs below.
- 1. Understanding Refrigerant and Its Importance
- 2. Signs of an Air Conditioner Gas Leak
- 2.1. Reduced Cooling Performance
- 2.2. Unusual Noises
- 2.3. Increased Humidity Levels
- 2.4. Higher Energy Bills
- 2.5. Frozen Evaporator Coils
- 2.6. Sweetish Odor
- 3. Methods to Perform an Air Conditioner Gas Leak Test
- 3.1. 1. Visual Inspection
- 3.2. 2. Soapy Water Method
- 3.3. 3. Electronic Leak Detectors
- 3.4. 4. UV Dye Leak Detection
- 3.5. 5. Nitrogen Pressure Test
- 4. Safety Precautions When Handling Refrigerants
- 5. When to Call a Professional HVAC Technician
- 6. Common Refrigerant Leak Locations
- 7. Repairing Refrigerant Leaks
Understanding Refrigerant and Its Importance
Refrigerant is a chemical compound that circulates within your air conditioning system, absorbing heat from your indoor air and releasing it outside. This process allows your AC to produce cool air. Refrigerants work by changing states between liquid and gas, a property that facilitates heat transfer. Common refrigerants include R-22 (Freon), R-410A, and newer, more environmentally friendly options like R-454B. Without the correct amount of refrigerant, your AC cannot function properly. If your system is low on refrigerant, it almost always indicates a leak, as these systems are designed to be sealed.
Signs of an Air Conditioner Gas Leak
Recognizing the signs of a refrigerant leak is the first step in addressing the problem. Ignoring these indicators can lead to decreased efficiency, higher energy bills, and severe damage to your AC unit.

Reduced Cooling Performance
One of the most noticeable signs of a refrigerant leak is a significant drop in your air conditioner’s cooling capacity. If your home isn’t getting as cool as it used to, or if the AC takes much longer to cool your space, low refrigerant levels might be the culprit. The refrigerant is responsible for extracting heat from the air, and when it’s escaping, the system struggles to perform this essential function.
Unusual Noises
Listen for any strange sounds emanating from your air conditioner. Hissing, gurgling, or bubbling noises often indicate that refrigerant is escaping through a crack or pinhole in the system’s coils or lines. A hissing sound is like air escaping a punctured balloon, and it will stop once all the refrigerant is gone. A bubbling sound might suggest a larger leak.
Increased Humidity Levels
An air conditioner’s job isn’t just to cool the air; it also helps to remove humidity. When refrigerant levels are low, the system’s ability to dehumidify is compromised. This can lead to a noticeable increase in indoor humidity, making your home feel sticky and uncomfortable, even when the AC is running. This increased moisture can also contribute to mold and mildew growth.
Higher Energy Bills
When your air conditioner is low on refrigerant, it has to work much harder to achieve the desired cooling temperature. This increased workload translates directly into higher energy consumption and, consequently, higher electricity bills. If you notice a sudden spike in your energy costs without any other apparent reason, a refrigerant leak could be the cause.
Frozen Evaporator Coils
It might seem counterintuitive, but a lack of refrigerant can cause your AC’s evaporator coils to freeze over. This happens because the low refrigerant levels disrupt the normal heat transfer process. The coils become too cold, causing condensation to freeze on them, potentially blocking airflow. Ice buildup on the coils is a strong indicator of a refrigerant leak and can lead to more serious system damage if not addressed promptly.
Sweetish Odor
Some refrigerants, when they leak, can produce a distinct sweetish smell, often compared to nail polish remover. If you detect such an odor near your AC unit, it could indicate a refrigerant leak.
Methods to Perform an Air Conditioner Gas Leak Test
Detecting and locating refrigerant leaks requires specific tools and techniques. While some methods can be attempted by a homeowner, many are best left to certified HVAC professionals due to the specialized equipment and safety precautions involved.
1. Visual Inspection
The simplest method is a visual check. Inspect visible refrigerant lines, fittings, and around the indoor and outdoor units for any signs of oil stains or frost buildup. Refrigerant often leaks with a small amount of lubricating oil, which can leave a visible residue.
2. Soapy Water Method
This is a traditional and cost-effective method for detecting larger leaks. Mix a solution of dish soap and water in a spray bottle. Apply the soapy mixture to suspected leak areas, such as coils, joints, and fittings. If there’s a leak, you’ll see bubbles forming as the refrigerant escapes. However, this method is not effective for small leaks or in windy conditions.
3. Electronic Leak Detectors
Electronic leak detectors are highly sensitive tools used by professionals to pinpoint refrigerant leaks. These devices use various technologies, including heated diode, corona discharge, infrared, and ultrasonic sensors, to detect the presence of refrigerant gas. When the detector senses refrigerant, it will typically emit an audible beep or light up. Some advanced models can detect leaks as small as 0.03 ounces per year. These detectors are generally accurate but can sometimes struggle with very small or hard-to-access leaks.
4. UV Dye Leak Detection
This method involves injecting a fluorescent UV dye into the AC system. The dye circulates with the refrigerant, and any escaping mixture will accumulate at leak points. When scanned with a UV light, the dye glows, clearly marking the location of the leak. UV dye is particularly useful for finding small or complex leaks and can remain in the system for long-term leak monitoring. It’s important to note that the dye can sometimes make a mess and should be used with caution.
5. Nitrogen Pressure Test
A more advanced method involves isolating the system, removing the refrigerant, and then pressurizing the lines with nitrogen. The system is then sprayed with a soapy mixture, and any bubbles indicate a leak. This is a thorough method for pinpointing leaks in line sets and coils.
Safety Precautions When Handling Refrigerants
Refrigerants are chemicals that can pose health and safety risks if not handled properly. Always prioritize safety and follow these guidelines:
- Personal Protective Equipment (PPE): Always wear safety goggles to protect your eyes, chemical-resistant gloves (like nitrile or neoprene) to prevent skin contact and frostbite, and long-sleeved clothing to shield your body from splashes.
- Ventilation: Ensure adequate ventilation when working with refrigerants, especially in enclosed spaces. Refrigerant vapor can displace oxygen and lead to asphyxiation.
- Avoid Ignition Sources: Keep refrigerants away from open flames, sparks, and hot surfaces, as some refrigerants can be flammable.
- Proper Handling of Cylinders: Handle refrigerant cylinders with care. Never lift them by the valve, and always keep the caps on when moving them.
- Emergency Procedures: Know the first aid procedures for refrigerant exposure, including skin contact, eye contact, inhalation, and ingestion. Seek immediate medical attention if any exposure occurs.
- Professional Handling: Due to the potential hazards, it is highly recommended to have refrigerant leak tests and repairs performed by certified HVAC professionals. They have the necessary training, tools, and safety equipment.
When to Call a Professional HVAC Technician
While some basic checks can be done by a homeowner, a refrigerant leak test and subsequent repair often require professional expertise. You should contact an HVAC technician if:
- You suspect a refrigerant leak based on the signs mentioned above.
- You need to use specialized equipment like electronic leak detectors or UV light kits.
- The leak is in a difficult-to-access area.
- You are uncomfortable or unsure about handling refrigerants and associated safety risks.
- The system requires recharging after a leak is found and repaired.
Professionals can accurately diagnose the problem, perform the necessary repairs, and recharge the system with the correct type and amount of refrigerant, ensuring your AC operates efficiently and safely.
Common Refrigerant Leak Locations
Refrigerant leaks can occur in various parts of your AC system. Knowing these common spots can help during a professional inspection:
- Evaporator Coil: Located inside the indoor air handler, this is a frequent site for leaks due to corrosion or wear.
- Condenser Coil: Found in the outdoor unit, this coil is exposed to the elements and can corrode over time.
- Refrigerant Lines (Line Set): These copper tubes connect the indoor and outdoor units. Leaks can occur at fittings, joints, or along the length of the lines due to damage or wear.
- Schrader Valve: These are small valves used for charging and servicing the system. They can develop leaks over time.
- Fittings and Connections: Joints where refrigerant lines connect to components are common leak points.
Repairing Refrigerant Leaks
The repair of a refrigerant leak depends on its size and location. Small leaks in refrigerant lines might be patched or brazed. Leaking Schrader valves can often be repaired or replaced. However, leaks in major components like the evaporator or condenser coils are often not repairable and require component replacement. Attempting to recharge a leaking system without fixing the leak is a temporary and costly mistake. After a leak is repaired, the system must be properly evacuated, leak-tested again, and then recharged with the correct amount and type of refrigerant.
If you suspect your air conditioner has a refrigerant leak, it’s essential to act quickly. Early detection and professional repair can save you money on energy bills, prevent further damage to your system, and ensure your home remains comfortable and your indoor air quality is maintained. Always prioritize safety and consult with a qualified HVAC technician for accurate diagnosis and reliable solutions.